TicketMaster Spinner Bot Manual & FAQs
Latest Features
TB Auto Pilot™
This is a new technique under development which will take tickets grabbing functionality of the software to next level.
Super Fast Grabbing using TBFS™ v2.0
This is a new technique introduced by our developers to substantially increase tickets grabbing as well as checkout speed.
Speedy Checkout (Tickets which needs to be purchased for reservation will use this by default)
This is the first version of our trademark TBFS™ technique for fast checkout.
Quick Search Tickets using TBFS Technology
This is the first version of our trademark TBFS™ technique for grabbing tickets fast.
Recommendations
1) Use your rotating proxies in Proxies.txt and assign dedicated proxies in Bypass Accounts.txt. Don't put dedicated proxies in Proxies.txt.
2) Please log into new accounts before the queue times so they are ready. For this purpose, there is a button in "Accounts Manager" which says "Log into all the new (previously not logged-in) bypass accounts". This will log into all the unused accounts one by one to save their cookies. This feature might not work at peak/queue timings.
3) If you are having any issues with the LiveNation events, please replace the event URL by replacing concerts.livenation.com with www.ticketmaster.com and it will work.
Account Related Information
Ideally if you have non-rotating proxies, you can assign them to each account in the following format.
Email:Pass:CVV|IP:Pass
If the proxies are password-protected, you can use the following format.
Email:Pass:CVV|IP:Port,Username:Pass
Example: [email protected]:password:123|73.64.2.12:2143:username:password
That proxy will forever be assigned to that particular account for all the tasks associated with that account and will ensure that your account will never get flagged.
The issue with assigning rotating proxies to the queue accounts is that their IP can get offline anytime and there’s a new ip in the middle of the session which can get the account locked. You can still use the same account to purchase on multiple events or join multiple queues using the same account and IP, as long as you have assigned a dedicated proxy to the accounts. This is not preferred using rotational proxies.
Examples of rotating proxies:
proxy.packetstream.io:31112:username:password_country-UnitedStates_session-bkO6kxm6
proxy.packetstream.io:31112:username:password_country-UnitedStates_session-vkdf6sEm2
resipro.bartproxies.com:7778:B_userid_US___90_ss-C4E6m8d5e3G1:password
us-1m.geosurf.io:11564,356657+US+11564,356657-367893:password
gw.ntnt.io:5959:username-cc-us-sid-45656:password
Setting up event to search for tickets
1. Click “Set Event Details”.
2. Paste the URL of the TicketMaster event in the URL box at the top and click “Add this event” button.
3. Select Quantity for tickets you want to search.
4. The Ticket Title/Box# box will load the the ticket types for that particular event and will turn yellow.
5. Select the appropriate ticket title from the drop down.
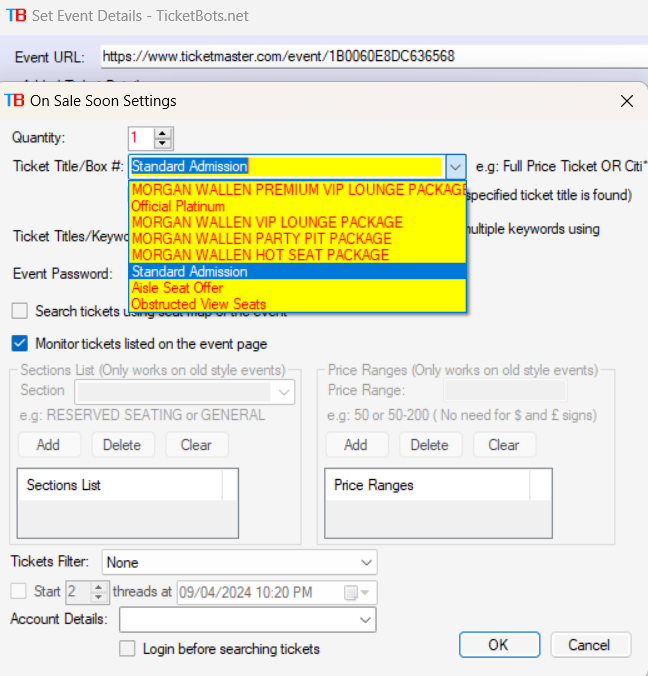
6. Although the ticket titles load in most cases especially before queue but in case the ticket titles are not loaded, you can specify ticket titles as following.
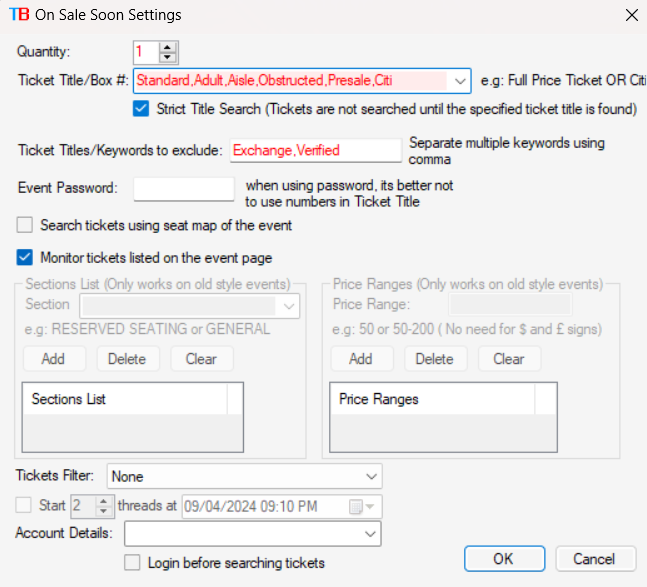
As you can see above, you can input probable ticket titles (in preferred order) separated by comma. In this example "Standard,Adult,Aisle,Obstructed,Presale,Citi", the software will first look for ticket title containing "Standard" then "Adult" then "Aisle" and so on.
You can use * as well if you don’t know the whole title. For instance, you can use Citi*Member for Citi Card Member Presale. By default, * are entered at the start and end of the search so for example, entering "View" in ticket title wil match "Obstructed View Seats".
7. Enter the password in the Password box if there is any. For events, where you are entering password, the ticket title is automatically grabbed using password even if the ticket titles do not load and you have entered incorrect ticket title in the box.
6. Select the filter that you want to use for tickets. You can set it later by right-clicking the event, clicking Edit this event and then selecting the filter from the list. You can set filters from Ticket Filters window which is described afterwards.
7. Click OK and name the event.
8. Repeat above steps for adding more events.
9. You can import/export all the events in a TXT file to load it later or load it on another place by right-clicking the events list and clicking Export or Import options.
Important Info regarding Ticket Title:
The ticketmaster has changed the way the ticket titles appear on the event page, you can look for the ticket title for a particular ticket from the yellow marked area.
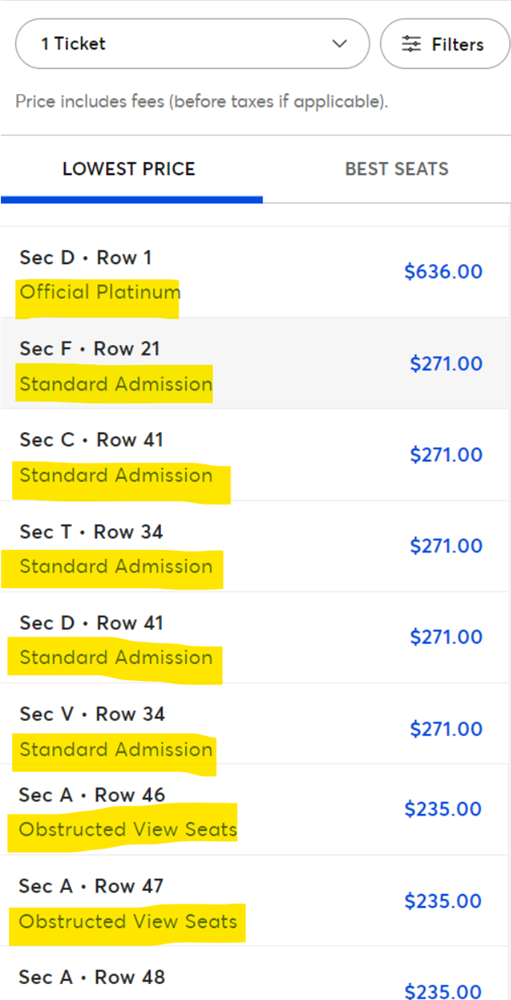
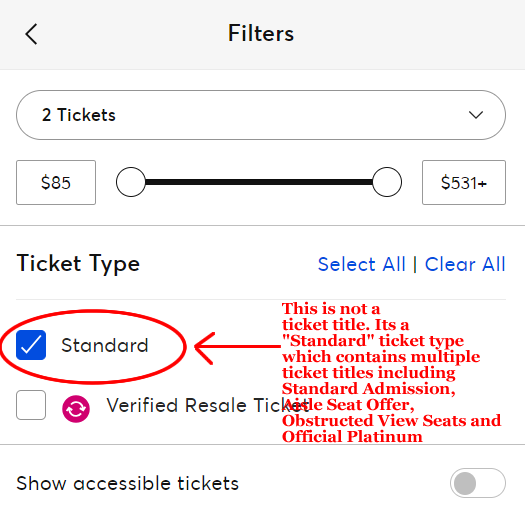
Previously, ticket types and ticket titles used to be the same thing. Now ticketmaster has assigned multiple ticket titles under a single ticket type. Do not confuse yourself with this. Just make sure that you do not look under the filters for ticket titles, rather just below the ticket:
Starting Search
1. Switch to main window of the bot, select number of threads (simultaneous searches) and click “Start Searching Tickets”. The software will search all the events which are added in “Set Event Details” window and enabled/ticked as well.
OR
2. In the “Set Event Details” window, right-click the event and click “Start new search for selected events only” then select number of threads (simultaneous searches) to start. This will start searches for that event only.
Setting up Notification Settings
1. On the main window, tick “Notify me through email”.
2. Click "Sign in using Google". A browser will open where you have to login from the Gmail account from which you wish to send emails.
3. In the “To Email”, type the email address where you want to receive an email.
4. Click “Test Notification” at the bottom to test the settings. If you are unable to send notification email, make sure you have followed above steps to enable smtp in your account. For a video tutorial, check the video here: https://youtu.be/owq9Bc3ARYU
5. If you want sound notification as well – Check the checkbox saying "Play Sound" then click “Browse” to select the audio file to run when the Tickets are found. A sample file of Alert.wav is already present in the folder.
Setting Up Filters
1. Click “Tickets Filters” on main window to open “Tickets Filters” window.
2. Click New to create a new filter.
3. Set the Section, Row, Qty or Price detail, that you want.
4. Example: If you want tickets under $200. You can select ‘In-Range’ in the Price Condition drop-down and set the Price Filter to ‘0-200’.
5. Example: If you want tickets for rows between 1 to 20 or A to F. You can select ‘In-Range’ in the Row Condition drop-down and set the Row Filter to ‘1-20’ or ‘A-F’.
6. If you want sections containing floor in their name, select Section Condition as Contains and enter Floor in Section Criteria.
7. Once done, click ‘Save’ button above to save the filter.
8. You can add multiple conditions to the same filter by clicking New button at the top left corner.
9. If you want to delete any condition, select that line and press DEL on your keyboard.
Selecting Filters for Event Search
1. Go to ‘Set Event Details’ window.
2. Right-click any of the event that you want to set the filter on and click "Edit this event".
3. Select the Ticket Filter from the bottom that you want to use for that event and click "Save"
Purchasing Tickets
a) Using Account & Default Credit Card on File:
Click “Load Accounts” button to load Ticketmaster accounts from any text file, preferably the Accounts.txt that is in your bot’s folder. You have to load the accounts in the following format:
[email protected]:password:CVV [where, CVV code is the CVV of the default credit card on your TM account]
If the ticket you want to purchase is grabbed without logging into the account and there is no account shown in the “Account” column of that ticket in Tickets Management window, you can simply select that ticket and click “Purchase selected tickets” button to purchase that ticket using the selected account from the Accounts list. The ticket will be purchased using the default credit card on that Account using the CVV you specified.
b) Using Credit Card without saving it from any account:
In the “Tickets Management” window, click “Set Credit Card Details” button and add your credit card details in the built-in browser then click “Save” button and name the credit card you just added.
If you want to purchase a ticket for which the account is already logged in (For e.g events with queue which requires accounts to be logged in first before grabbing tickets) and the account column is showing the logged in account, then at the bottom left corner, you can tick “Purchase using CCs” and then select the credit card detail and click “Buy using this CC”.
Discarding Tickets/Re-grabbing Tickets
If you don’t like the grabbed tickets, you can select that ticket and click “Restart this thread” to discard those tickets or you can right-click the ticket and click “Restart selected thread(s)”.
What are Proxies and how and where to Load Proxies
Proxy is something that masks your IP address and route your requests through another server, http://en.wikipedia.org/wiki/Proxy_server - You have to search and load the proxies in Proxies.txt in IP:port format (one per line). If your proxies are private and requires username and password, here is the format, IP:port,username:password. Below are few examples of dummy proxy formats.
66.59.88.104:80
98.99.50.14:8080
66.59.88.104:80,username:password
98.99.50.14:8080,username:password
For Luminati, enter only this line:
Luminati:US,lum-customer-[userID]-zone-[zoneName]:[password]
For e.g:
Luminati:US,lum-customer-c_34a3e674-zone-residential:e82j36r78ghs
You can load proxies by clicking “Proxies Loaded” link on the left of “Reload Proxies” button on main window. If you want to update the proxies in Proxies.txt without resarting the software, click "Reload Proxies" after saving proxies file.
General Features & Functionality of the software
Checking the log of a particular thread
Double-click on any line/thread on Tickets Management window to view its past log.
Joining Queues which require accounts to be logged in
You can put TicketMaster accounts from which you want to join the queue in “Bypass Accounts.txt” in the software folder which can be opened by clicking “Bypass Accounts Loaded” link on Tickets Management window.
The software will use those accounts to enter the waiting rooms.
Each account will be used once on a particular event. So, if you are searching for 5 events, same/single account will be used on all the events.
Joining Queues which require email verification on accounts
To proceed with email verification, you can enter the master IMAP account under “Accounts Manager” window and click “Login” button to log into IMAP account to fetch all the emails. The master IMAP account means the account to which all the emails from bypassing accounts are forwarded. You might have to restart the software after setting up IMAP account.
The software will log into IMAP account and grab all the OTP emails that are received and forwarded by the bypass accounts while joining the queue.
Gmail IMAP settings have stopped working. Sample GMX IMAP accounts settings is given below:
IMAP Server Details -> ssl:imap.gmx.com:993
Email Address: [email protected]:YourGMXPassword
OR
You can also use Gmail to check for emails. Click "Switch to Google Sign In" at the top right of "Accounts Manager" window.
Now click "Sign in using Google". This will open up a browser where you have to log into your Gmail account and proceed to next step which will log you into Gmail in the software. For a video tutorial, check the video here: https://youtu.be/owq9Bc3ARYU
Joining Queues bypassing OTP email verification on accounts
Our software bypasses email OTP verification for accounts automatically after the OTP verification is done for that account once.
Tip: The best practice is to verify OTP on accounts even before the queue by clicking “Verify OTP on this account” button in “Accounts Manager” window.
Tip: You can click “Verify OTP on this account” button as many times as you want and it will keep on selecting next account to start OTP verification process on that account using logged in IMAP master account.
Tip: If you want to enter OTP manually to complete email verification, tick “Enter OTPs Manually” under settings box in “Tickets Management” window.
Automatic unlocking of accounts
Our software automatically unlocks locked accounts which are forwarded to master IMAP account. You can select any account from “Accounts Manager” window and click “Reset Password” button to unlock specific account from the list.
FAQs
1) My threads are saying “Waiting for OTP email, OTP email not received yet for this account”.
Check whether you are receiving OTP email from Accounts Manager window and that Monitoring Status on top left says “Started” in green color. If monitoring status is started and still you are not receiving emails login IMAP account from browser and see if you are receiving OTP emails on your master IMAP account as some accounts do not receive OTP emails sometimes.
Also make sure that all bypass accounts accounts are forwarded to master IMAP account.
2) Why accounts are locked?
Accessing account from multiple IPs or browsers gets it locked. There is nothing to worry about this as this done automatically by the server and can happen manually through browser as well. When using rotating IP services like Luminati, the accounts sometimes get locked due to change in IP. Also, when you access the bypass account manually from browser, it gets locked as it is logged in from another IP last time.
3) The threads are stuck on “Logging in from another thread”
The software is designed to use single account for multiple events. So, if one account is in the process of logging in from one thread, other threads wait for it to login. As soon as that account is logged in, other threads directly log in and enters the queue. This behviour ensures maximum efficiency of time and resources.
4) Monitoring Status for IMAP is not changing to "Started" in Accounts Manager
If the IMAP account is not logging in then turn on "Allow less secure apps" as described in the manual above. If the IMAP account is logged in as shown in the log then make sure that there are not large number of unread emails in the Inbox of the IMAP account otherwise you will have to change your IMAP account to other. Large number of unread emails take a lot of time to load so it is necessary to use account with less number of unread emails..
5) I have encountered a unique problem not discussed in this manual
After you encounter the problem, turn off the software and open this path on your computer from file explorer -> “C:\Users\TB\Documents\TicketMaster Spinner Bot with LiveNation\DebugData”.
After opening the above path, find and zip the folder of the last run in which you encountered the problem. Zip that folder.
Open http://www.wetransfer.com from the browser and click (+) icon then navigate to “C:\Users\TB\Documents\TicketMaster Spinner Bot with LiveNation\DebugData” path and select the file you just zipped.
Enter your email and in the “To Email” enter “[email protected]”.
Click send to send debug report to the administrator.
4) When the purchase fails automatically and the popup browser opens, the circle keeps on rotating and doesn't load credit card details.
At the top of the window under menue click Actions -> Delete CACHE. Then click the HOME icon at the top. If that doesn't work, click "Change Proxy" button at the top. If the problem still persists, click "Remove Proxy from browser" to see if its the proxy causing the problem.
5) A lot of times when you enter the waiting rooms, the password is unconfirmed, and the correct password is only known after the sale starts. How do we specify the password after the sale starts?
When the thread gets the turn after finishing the queue, it re-loads the password from the event details so while its in the queue, you can change the password by editing the event deails from "Set Event Details" window.